

What NotebookLM Really Is
Many people online call it a “second brain” or even “magic,” but in reality, it is still just a technology. Today, we are going to take a deeper look at how this technology actually works, strip away some of that so-called magic, and show you how to use it properly.
NotebookLM consists of three layers. The first layer is data ingestion, or what NotebookLM calls “sources,” which you can see on the left. The second layer is user interaction, shown in the middle as the chat window. The third layer is output generation, which you can see on the right in what is called the Studio.

How NotebookLM Ingests and Processes Data
Let’s begin with the first layer: data ingestion. Here, we can see that NotebookLM allows us to ingest websites, documents, audio, video, images, and slideshows.
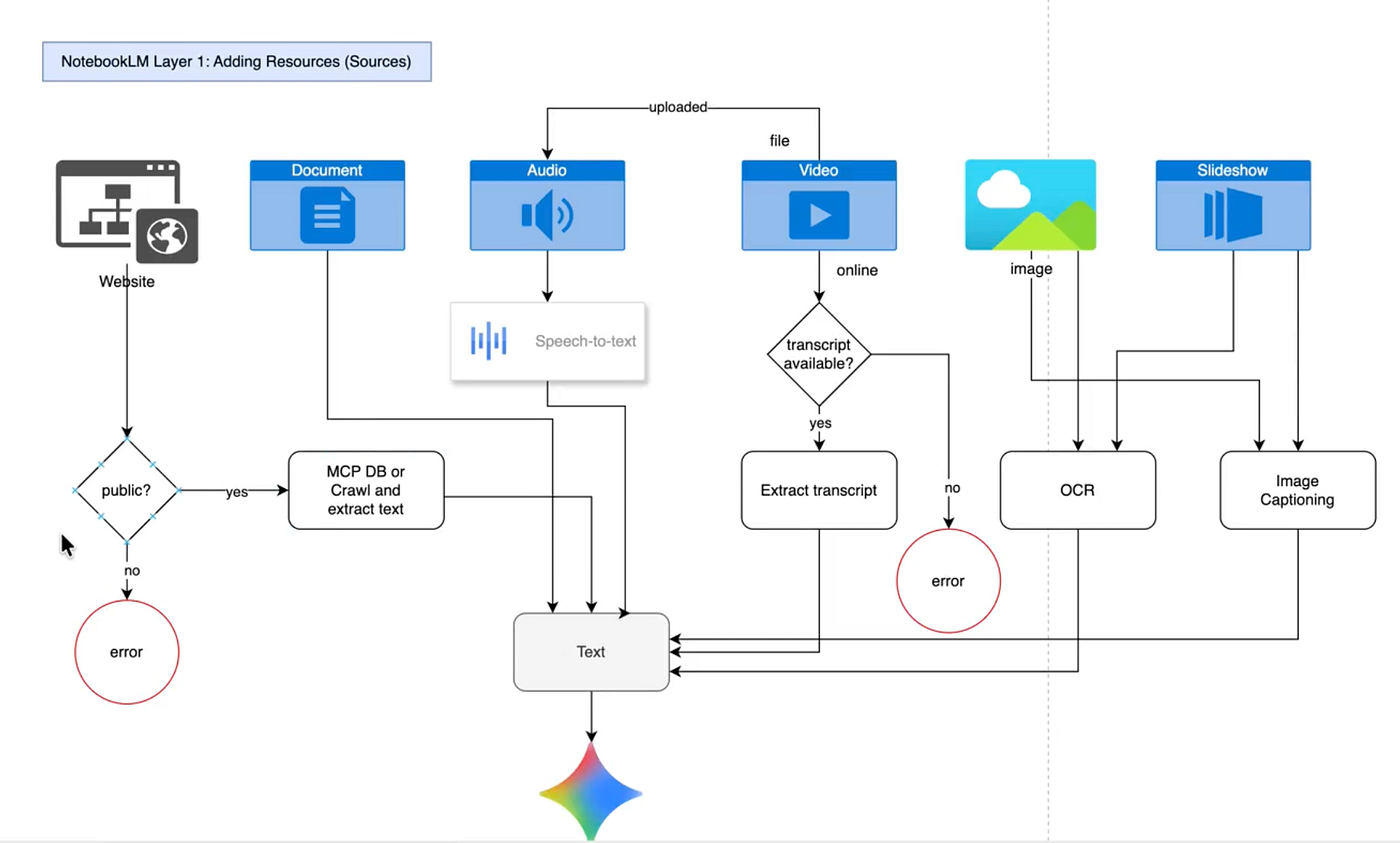
When it comes to websites, NotebookLM first performs a quick check to determine whether the site is public or not. If it is public, it either accesses its MCP database or crawls the website in order to extract the text. If the website is not public, it returns an error.
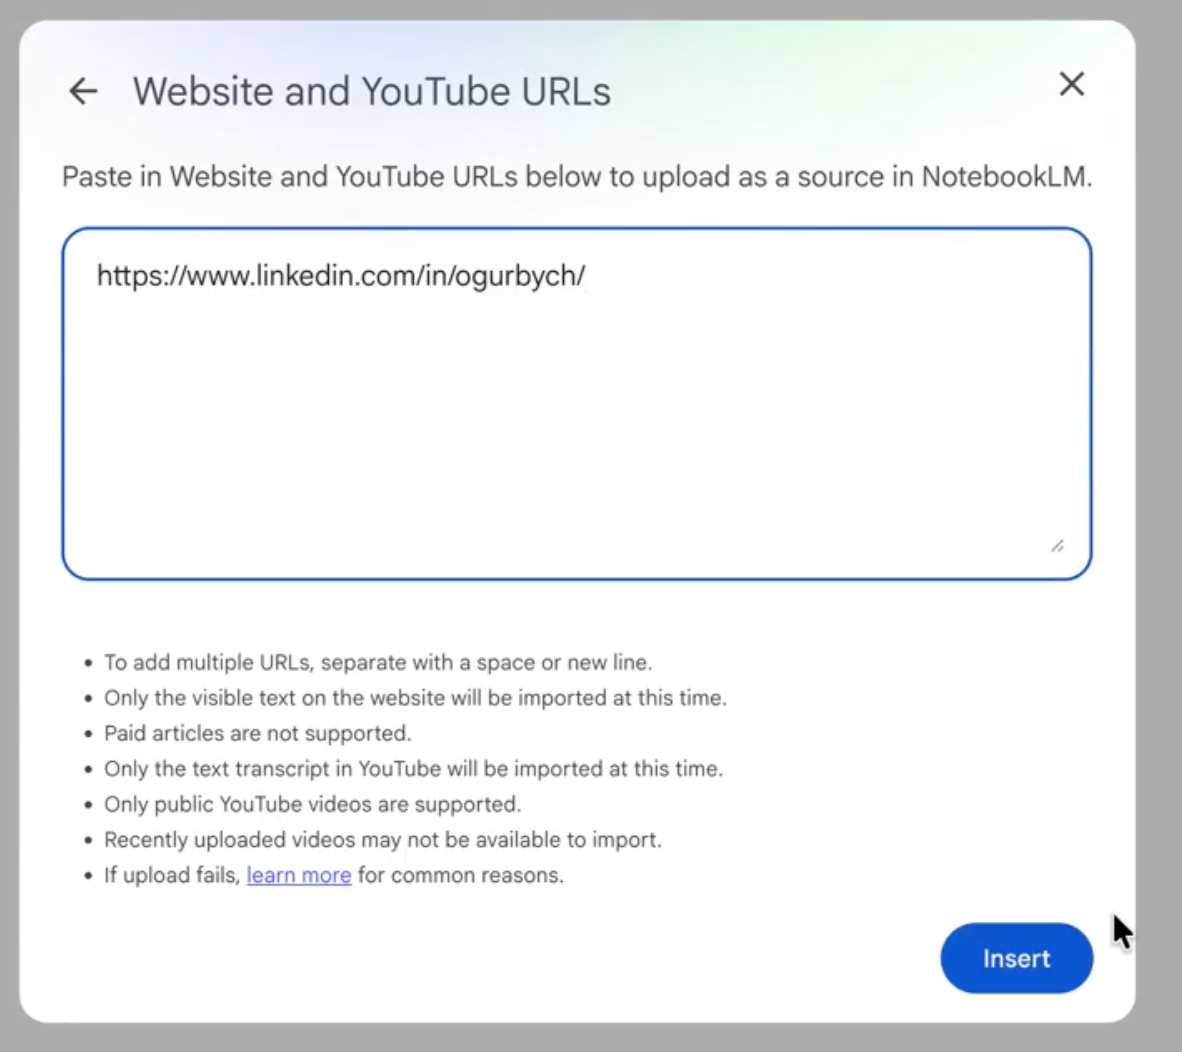
Let’s look at an example of a non-public website. This is my LinkedIn profile page. If I try to add it to NotebookLM by clicking “Add sources,” then selecting “Website,” and pasting in the URL to my LinkedIn page, we will see that it cannot be added because the website’s privacy policies do not allow it.
How Grounding and Retrieval Work
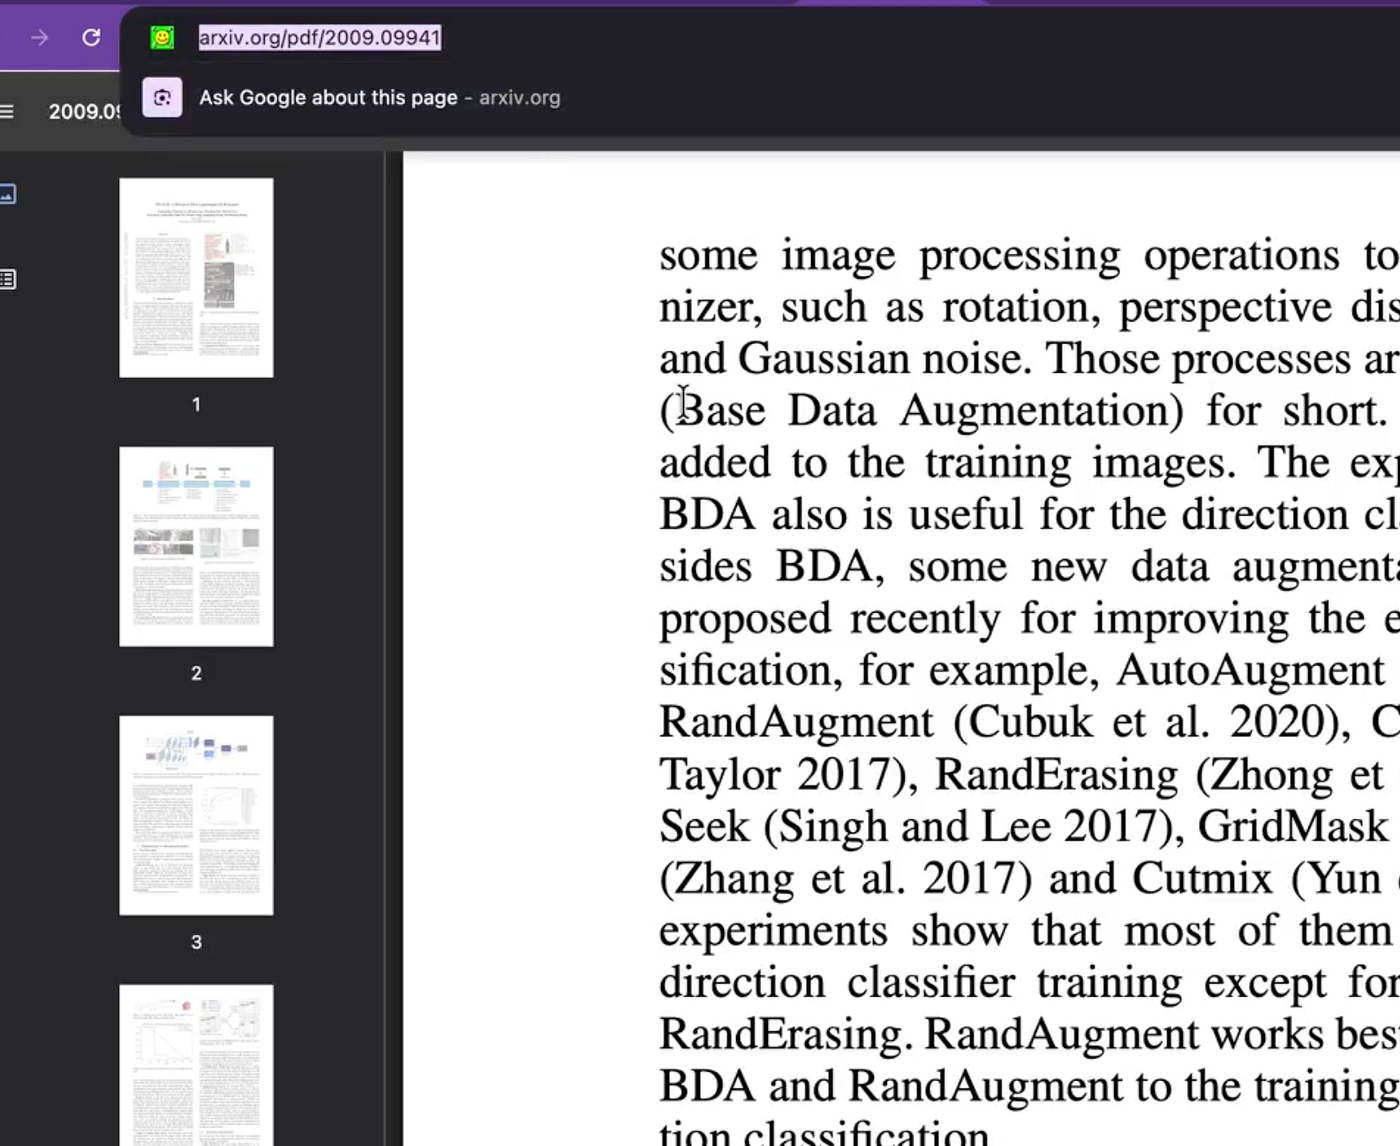
Now let’s use a different resource. For example, this page from arXiv. If we add it as a source, we can see that it is successfully added because it is fully public. arXiv is a free repository of preprints for research papers.
So what happens to a website resource after it is added? NotebookLM extracts the text from the webpage, removes HTML tags and other technical elements, and then passes that text to Gemini, which generates embeddings and stores them in a vector database. This is the essence -the core idea -behind NotebookLM.
This is also why it is such a Swiss Army knife and can work with almost any modality. Any document you add -whether it is audio, video, an image, or a slideshow -is ultimately transformed into text. That text is then converted by Gemini into embeddings, and those embeddings are stored in a vector database, which later serves as the grounding layer for all generations.
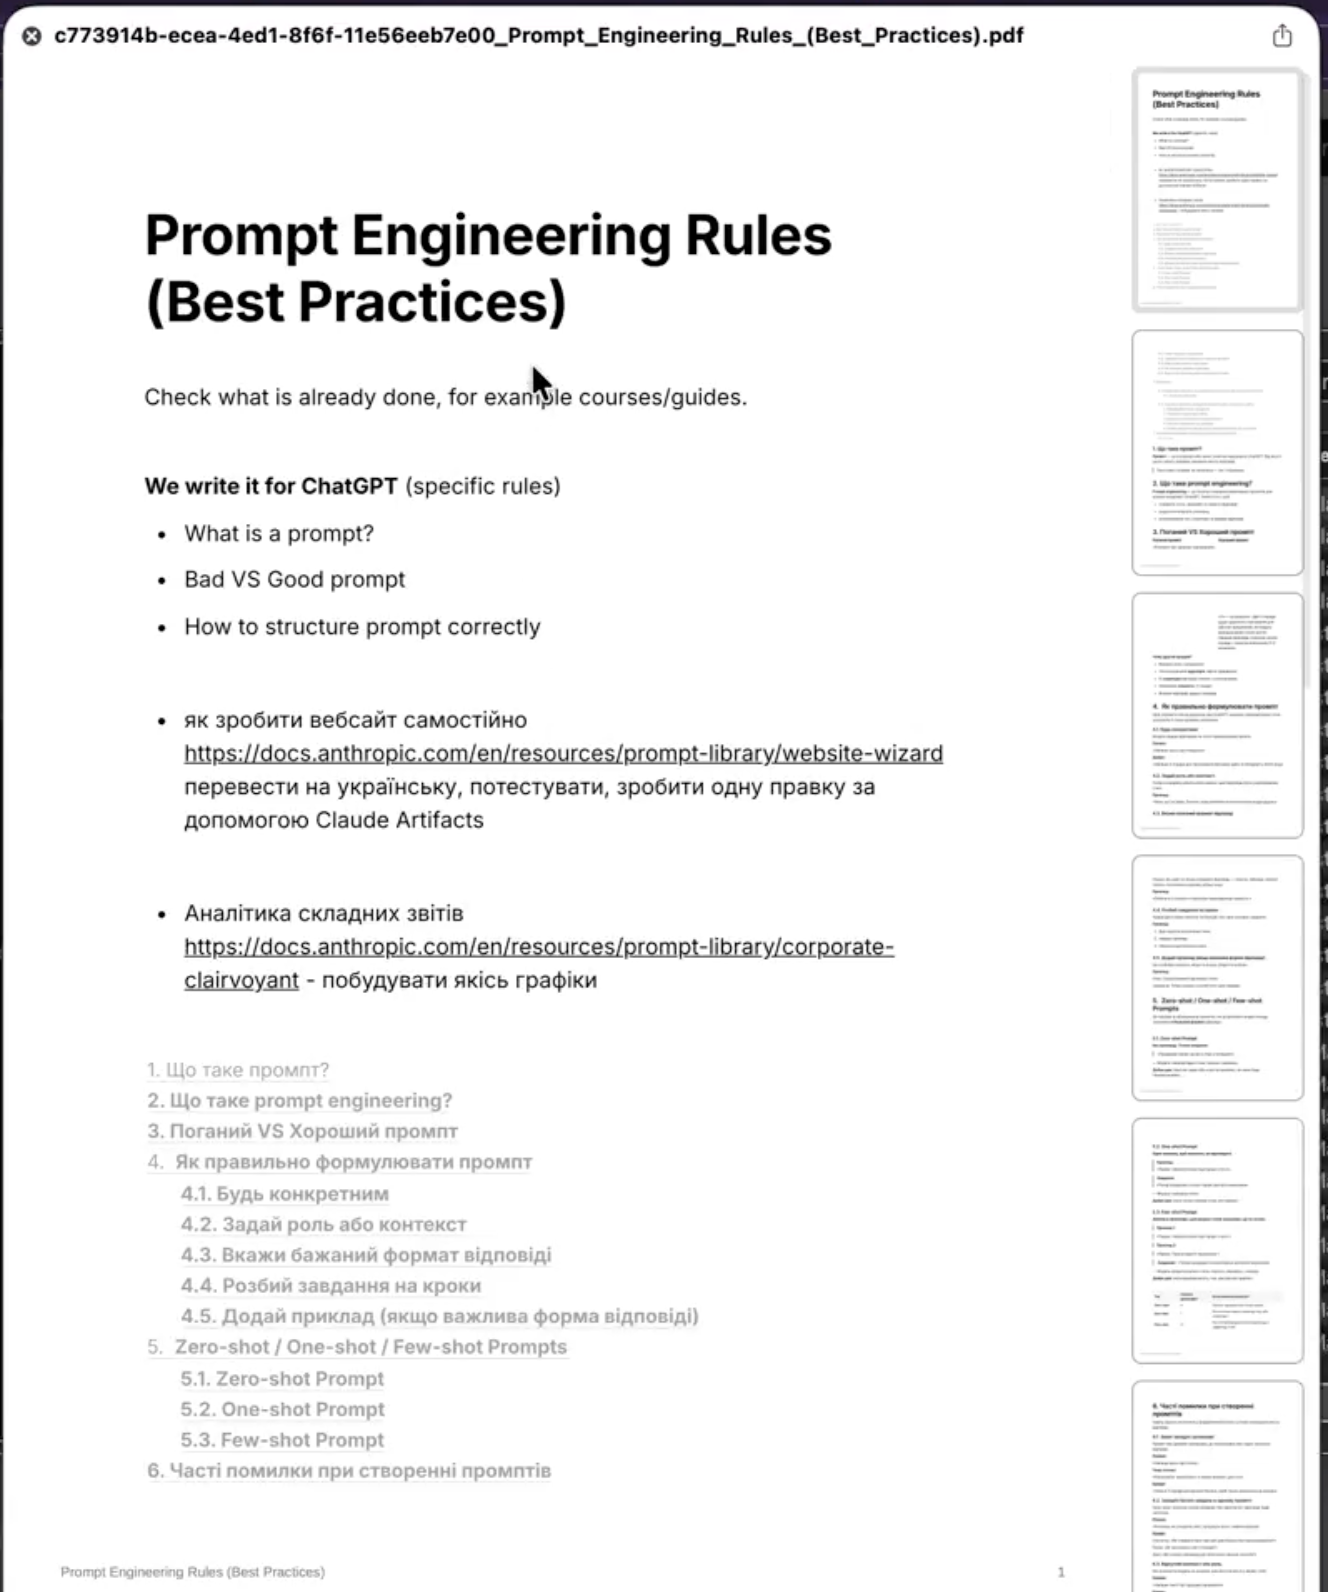
I exported this page about prompt engineering rules. Since it is a PDF document, it takes a few moments to process, but overall we can see that it has been processed successfully. We already have a summary, and everything looks fine.
Documents are fairly straightforward. The text is extracted as it is and then transformed in the same way as other inputs. Now let’s move on to audio.
For audio, Google uses its proprietary speech-to-text technology. Again, we click “Add sources,” then “Upload files,” and here we have an audio file.
Once we add the audio file, it takes a little time to process. In the background, the NotebookLM engine sends it through an API to another Google tool for speech-to-text conversion. That tool converts the MP3 file into text, and then the text is passed to Gemini. Gemini transforms it into embeddings. The same logic applies to video.
If we upload a video, we again click “Add sources,” then “Upload files,” and add the file. Video files are usually larger, so processing may take longer, but the principle remains the same. The audio stream is extracted from the video, and that audio track is then transcribed into text. Once again, the text is transformed into embeddings. The same story.
What You Can Generate in NotebookLM Studio
Now let’s talk about images and slideshows.
Images and slideshows are processed in a similar way. Both go through OCR, which stands for Optical Character Recognition, as well as image captioning. To understand what objects appear in images, let’s first look at OCR.
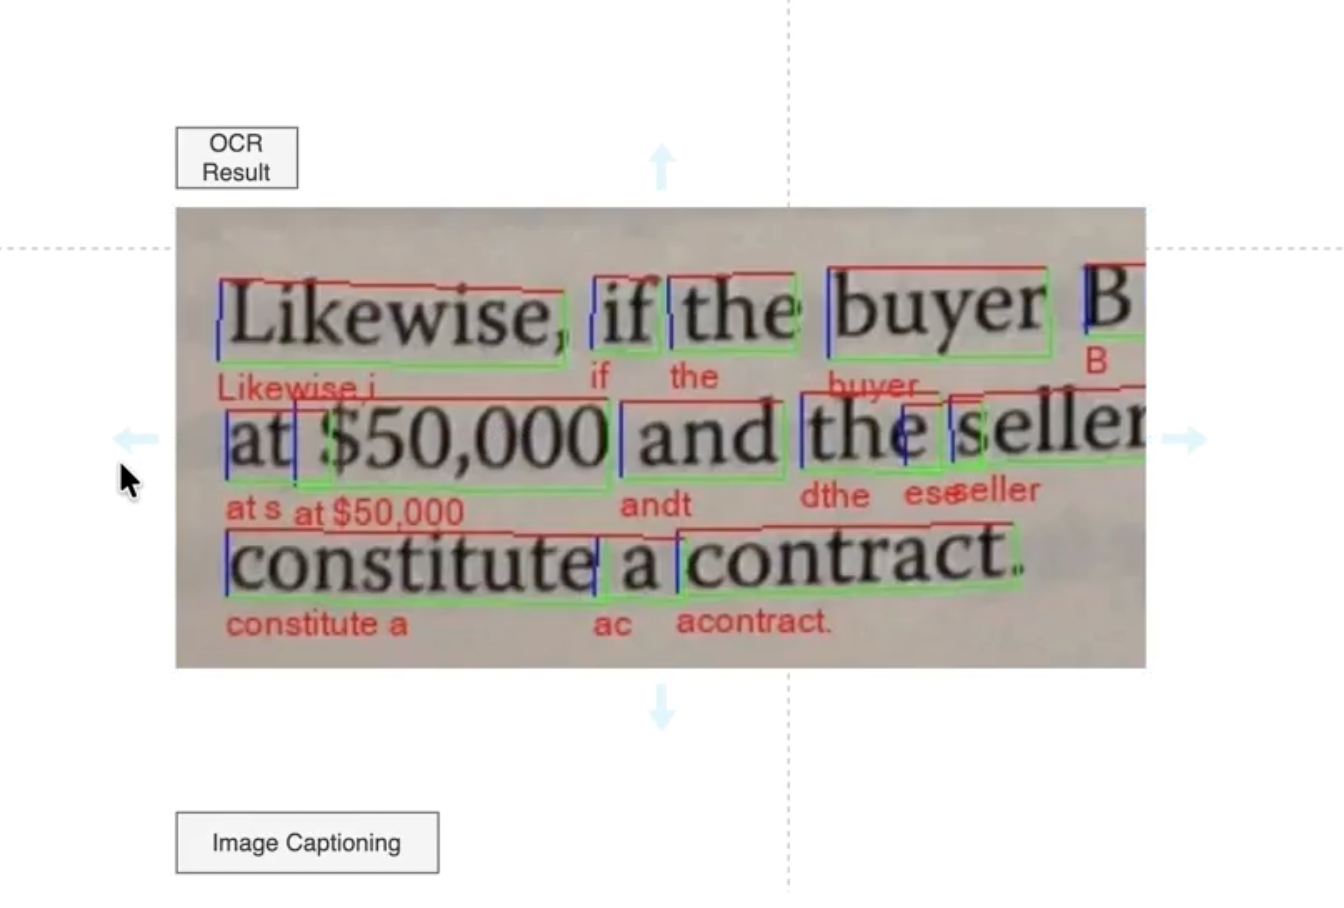
Here is the OCR result. We have an image containing words, and this AI technology allows us to extract every character and, consequently, every word from that image. It works in two stages.
In the first stage, the system tries to determine where the text is located in the image. You can see two layers of interconnected convolutional neural networks that eventually lead to a dense block with two prediction heads. One produces a probability map showing where the text is likely to be located in the image. The other predicts the probable borders of that text. As a result, a binary mask is created to identify where the text is located, and the image is segmented into areas that contain text.
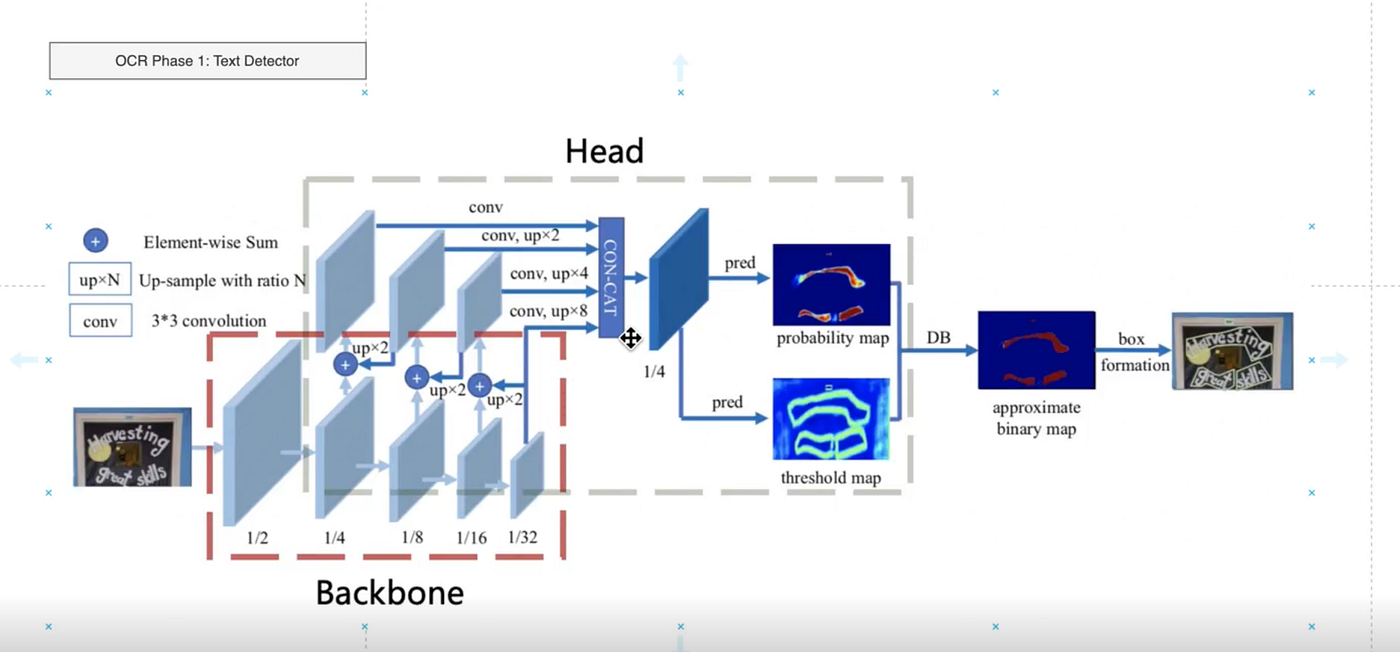
In the second stage, this output is passed to a text recognizer. As you can see, the part of the image that has been identified as text is sent into another neural network, or a set of neural networks, which slices that text block into words. Then, each word is passed to a recurrent neural network that predicts the probability of each token. Based on those probabilities, the final word is recognized. For example, from an image containing the word “state,” the system extracts the text token “state.” This is how OCR works.
As for image captioning, it is essentially a human-like description of an image.

For example, if you take a snapshot of the scene you see now, the caption might be something like: “a man sitting in front of his MacBook and explaining a concept.” Here, for instance, we can see a natural scene with giraffes in the wild walking down a road. This image is passed into a convolutional neural network, converted into a form of embedding, and then sent to a second layer of recurrent neural networks, such as LSTMs, which generate a textual description of the image.

Of course, this type of neural network is trained on a large corpus of images paired with captions. Over time, it becomes better at understanding visual patterns and can then generate captions for new images.
In this way, images and slideshows are also converted into text. So, as you can see, anything that you upload into NotebookLM ultimately becomes text. That text is then passed to Gemini, and Gemini — because it is Google’s proprietary technology — converts it into embeddings. Embeddings are simply vector representations of text: numerical vectors that represent data in a vector space.
Why do we need this? Because it allows us to perform vector similarity search.
To summarize, everything uploaded into the Sources panel on the left side of NotebookLM is stored in a large vector database. This is where phase one ends. Phase two begins when the user starts interacting with the data.
For example, suppose we ask: “Can you explain the differences between zero-shot and few-shot prompting?” What is happening here?
The user enters a prompt, and the modality is inferred from the prompt itself. In this case, the major source is this document about prompt engineering. The system takes our prompt and passes it to Gemini to generate embeddings.
These embeddings also have coordinates in vector space — abstract numerical positions that represent the meaning of our query. Our prompt, meaning the text we entered here, is then matched against the vector database. A vector similarity search algorithm — for example, one based on a dot product or another similarity metric — compares our query vector with all the vectors stored in the database, which represent the uploaded data.
This similarity search determines that the most relevant source is this particular document. Then, within that source, it identifies the parts of the text that are most relevant to our prompt. Here we can see references to those parts.
If we click on them, we can see that this section of the text is directly related to the request. One block discusses prompting in general, another covers zero-shot prompting, and others refer to few-shot prompting. That is exactly what we asked about.

So the vector search finds the most relevant source in the database, as well as the most relevant passages within that source. Then we receive an output.
This output is grounded. Grounding means that the user’s prompt is enriched with relevant context. The materials you saw on the left, when we clicked on the sources, provide that context. The context is retrieved from the vector database and used to enrich the original user prompt.
Once the database returns our query together with the relevant context, Gemini can generate a much better answer. This is what we call a grounded response.
Grounding helps reduce hallucinations in large language models, but it does not eliminate them completely.
They do still hallucinate, but much less frequently, and that is the obvious advantage. This brings us to the second layer. At this point, we understand how prompting works, how the chat functions, and how it interacts with the sources.
Now let’s move on to the final part: the Studio. The Studio includes a number of output modalities. We can generate audio, video, mind maps, reports, flashcards, quizzes, infographics, and data tables.

All of this output is grounded in the information we provide to the AI. In exactly the same way that my prompt was sent to the vector database, used to retrieve relevant context, and then turned into an enriched answer by Gemini, we can also generate audio.
If we click “Generate audio,” NotebookLM creates an audio overview. Here is how it works: we submit the same query together with the retrieved context, it goes to Gemini, and we receive an answer. But in this case, we do not want the answer as text — we want speech.
That text is then passed to another Google tool called text-to-speech. This is one of Google’s products, available in its cloud ecosystem. Here, it is used to generate polished audio output. It requires a text input, and depending on the configuration, you can choose different models, locales, voices, and other settings. Once generated, it produces spoken output based on the text and the selected tone of voice.

In this case, it took about 15 minutes to generate the audio, and it used six different sources. That is probably why it took so long. When we listen to the result, we can immediately hear that it draws from all six sources we provided.
The issue is that these sources are quite scattered in topic. One discusses startups, another covers recently funded AI startups, another focuses on the specific technology of molecules crossing the blood-brain barrier, another describes prompting approaches, and another deals with computer vision technologies and neural network architectures. That is why the generated speakers jump across terms like “crossing shuttles,” “zero-shot,” “one-shot,” and “complex neural network architectures.”
This illustrates an important point about NotebookLM: it is extremely literal. It takes everything you give it at face value. It assumes that you, as the user, know exactly what you want, and then it blends all the provided context into the final output.
So, for example, if I wanted it to talk only about prompting, I should deselect all the irrelevant sources. If I run it again with only the prompting-related source selected, the result becomes much cleaner and much more focused. The generated discussion stays on prompting, explains the rules, the tone, the structure, and the related examples. In other words, it gives us exactly what we wanted.
This leads to a very practical rule: if you want to generate something based on only part of your source set, explicitly select only those relevant sources. NotebookLM will then do exactly what you ask. The reverse is also true: if you leave irrelevant sources selected, the output will become messy.
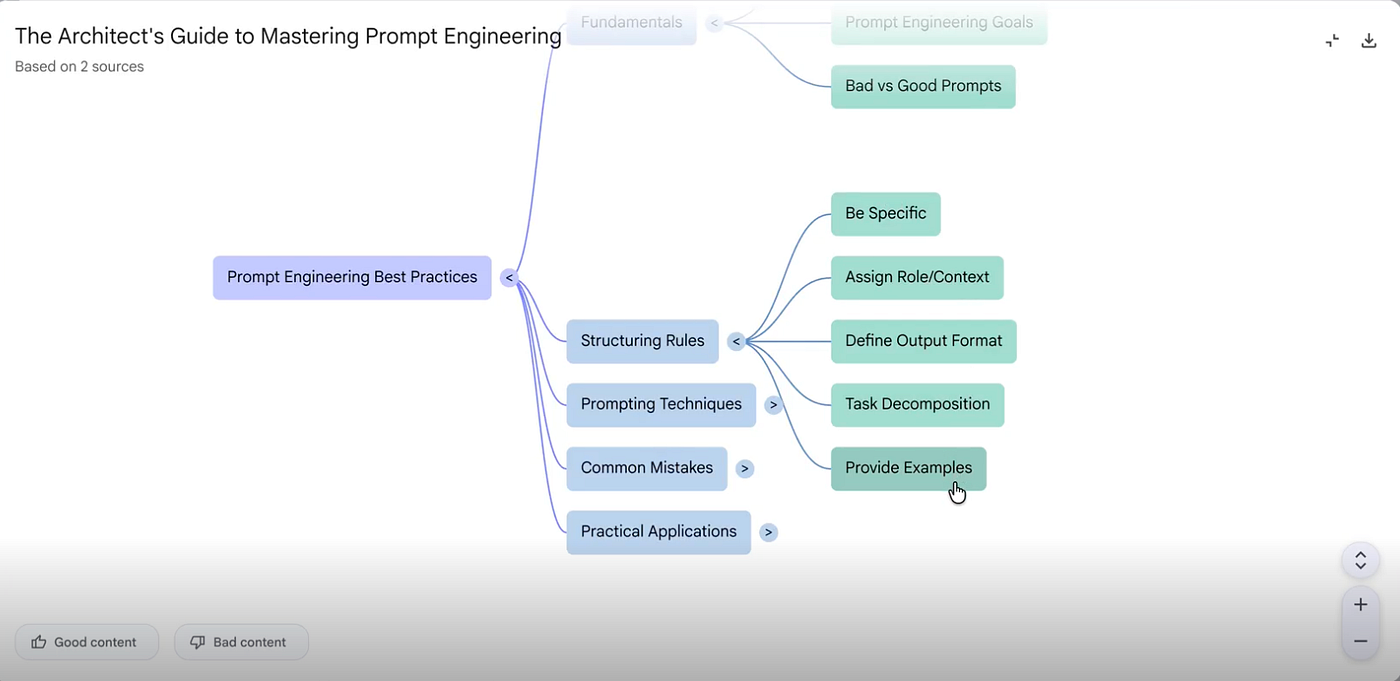
The same logic applies to other modalities, such as mind maps. Technically, the approach is very similar. The system takes your query, sends it to the vector database, retrieves the relevant context, passes that context to Gemini, and Gemini generates the response. That response is then passed to a downstream tool within Google’s ecosystem that renders it in the desired format.
If we go back to the notebook and generate a mind map while only the prompting-related source is selected, all the other sources are ignored. The result is exactly what we would expect: a mind map focused on prompt engineering, including core ideas such as fundamentals, structuring rules, prompting techniques, common mistakes, and practical applications. That is precisely the kind of structured output we wanted.
For video, the overall approach remains the same. Google uses another tool from its AI-powered workspace for video creation, based on its VO3 stack. To make generation faster, I can adjust the settings and choose a shorter response length. There is also an option to tune the conversational goal — for example, default, learning guide, or custom. For now, default is sufficient.
After shortening the response length, I can generate a short video in English and choose a simple style just to keep processing time manageable.
While the video is still being processed, we can explore the other modalities. For example, we can generate a report, flashcards, a quiz, an infographic, and a data table — all based on the same article about prompting.
The report, for instance, comes out as a briefing document with a strategic overview of prompt engineering best practices. It covers the fundamentals of prompting, frameworks for structuring prompts, examples of effective and ineffective prompts, the role of context, desired response formats, and comparisons between well-structured and poorly structured requests. It looks and reads like a real report.

The flashcards are also useful. They turn the source material into study cards. For example, one card asks about the core purpose of prompt engineering, and another asks why being specific is such a fundamental principle. The answers reinforce the key lesson: models provide more relevant results when the request is clearly formulated.

The quiz works in a similar way. It generates questions directly from the article content. For example, it may ask about the primary objective of prompt engineering when interacting with models like ChatGPT. In this case, the answer is to obtain more accurate and relevant responses. This kind of output is genuinely useful for teachers, lecturers, or anyone trying to turn source material into learning content.
The data table is also surprisingly good. I initially doubted whether it would generate a meaningful table, but it did. It organized the material into categories such as methodology, description, key elements, positive examples, negative examples, use-case scenarios, and expected output format. It even included the source.
That last detail matters. In this case, I intentionally used only one source because I did not want the result to become cluttered or inconsistent. And as we already saw, when irrelevant sources are included, the output becomes noisy. When the source selection is focused, the result is much cleaner and much more useful.
NotebookLM’s Limits, Risks, and Real Value
At its core, NotebookLM is a vector database containing data that provides grounding for Gemini and related tools. Grounding reduces the number of hallucinations, but it does not eliminate them entirely. So while you can expect NotebookLM to be highly precise, you should not assume it is 100 percent precise or 100 percent accurate.
It may overlook certain details both when processing inputs and when generating outputs. In our examples, we worked with relatively small documents, and the results were quite comprehensive. But when you move to documents that are thousands of pages long -or even hundreds of thousands of pages in aggregate -it becomes much more likely that some information will be missed because of context window limitations and other technical constraints.
So it is important to remain cautious. As you have seen, Gemini integrates very easily with NotebookLM. In this setup, NotebookLM essentially serves as a database -a data source that Gemini can use for grounded generation.
You also saw that all modalities, regardless of input type, are ultimately converted into text and then stored in the vector database. This is how NotebookLM, together with the broader Google stack, can connect information across different modalities: by first transforming everything into embeddings and then storing those embeddings in a unified vector space. This is the general principle behind how multimodal systems unify and relate diverse types of data.
One more feature worth mentioning is that NotebookLM can also perform search-including quick search, web search, and deep search. This functionality is somewhat similar to tools like Perplexity. One of the most striking aspects, however, is that it is available free of charge.
That alone makes it an exceptionally strong tool. At this price point, it is very difficult to find a real competitor.


